How to create your own stamp: tips and detailed instructions
The first thing you should do is to design the stamp. There are a lot of different types of affordable designs for stamps. Stamp design is the process of defining the type, components, interfaces, and other characteristics of an adhesive stamp.
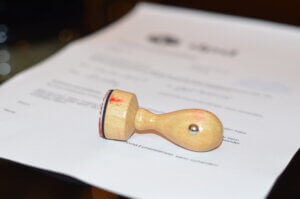
The stamp is usually a simplified image that contains only a basic sheet of information about the organization. You can make your own rubber stamps. The stamp design may include, for example: the name of the organization, the logo, and contact information in a box.
Types and peel of design for stamps
To make your own rubber stamps, special programs are used in which you can choose the shape and size of the print, add text and images, and change fonts with an eraser.
The result of stamp design is a design project - a set of models, properties, or characteristics described in a form suitable for stamp design. There are several types of stamp designs: corner, registration, a stamp with details, and an address stamp. The corner stamp is used if the organization or entrepreneur does not have typographic or “electronic” forms.
A corner stamp can be used for short-term correspondence, issuing current block certificates, etc. In this case, a corner stamp made in accordance with the necessary requirements gives the document an official character. In corner stamps, the lines are placed in the following order (top to bottom) - central institution (ministry), department, organization (institution, enterprise). These details specified in the text of corner stamps and seals of the same organizations must match.
 The registration stamp establishes the organization's responsibility for the document, at the beginning of the execution period. It contains: the name of the enterprise, fields for indicating the date of receipt, and the number (index) of the incoming document. This stamp is not placed on appendices to the document.
A stamp with the details of the enterprise, as a rule, is small in size, with a frame, and includes the short name of the linoleum, company, place of registration, and TIN.
The address stamp of a legal entity must contain the full name, full mailing address of the enterprise, incoming and outgoing numbers, and date. It may also include the organization's e-mail and website address.
How and where to design a stamp
You can use a free constructor to design and carve a stamp. This is a website where you can design your shim.
Using such a tool is easy:- Click on the "New stamp" button and select the stamp shape and color of ink, for example, pink.
- Select and carve the shape and set the size of the stamp seal layout, for example, 38 mm".
- Edit the surface ring and pad of the border, changing the thickness and diameter if necessary.
- Try to cut the stamp.
- Add the "Circle" component if we do not need rings.
- Supply "Text in a circle". Enter and edit the text.
- Let's transfer the inscriptions and speedball for a slice. Enter and edit the font, information that will be reflected in the center.
- Add "Pictures" from the list or upload your own in SVG vector format, and change the position with sliders.
- Order production or download the seal in PNG, SVG, ESP, PDF, and DOCX formats.
 Free seal iron designer has been making stamp patterns of varying complexity for many years for free, and sending to the manufacturer on an imprint order in one day. When using vector graphics the resulting layout allows you to draw and produce a stamp stamp for free. The intuitive interface of functions makes the production of seals with a coat of arms a very simple matter, without skills in such programs as Corel Draw, Adobe Illustrator, or Adobe Photoshop.
When using vector graphics, the resulting engraving allows you to:
- make and carve a seal of the organization or order a seal in the char, specialists based on the prototype by the required method of publication (embossing/photopolymer/rubber/sealing wax);
- scale the print to the required size from 1 pixel to infinity;
- has a carved smaller size, when designing complex projects and blades;
- scrap the elements of rubber material.
You can download and carve a finished copy of the architecture of the seal, and stamp in several standard documents by clicking and cutting the corresponding carve button on the left:
- PNG, this is a raster image. It has a transparent background and a high resolution of 600 dpi;
- SVG, this is a vector format. Vector graphics SVG allows you to scale the photo to the required size. It is necessary when ordering the production of a seal, or stamp by engraving;
- PDF, a well-known format of portable documents. This imprint is supported by all devices, as well as most programs.
- DOCX, this is a WORD document with your seal, and stamp, you only need to insert your text.
 The "Save" item simply saves your carve bas-relief of the equipment. Manual pocket or automatic seal, the stamp will always be at hand with the help of our editor. You can return to order the restoration and editing of the stamp at any time and upload your logo, add an address and city, overlay a coat of arms, transfer a photo, engrave state symbols, foreign letters, IP values - INN, full name or specifying the name of the organization if necessary, just click the appropriate tab.
When ordering a seal or stamp, the paint is purchased by the customer separately.
Creating a stamp sketch using a program and carving tools
In order to make a stamp with your own carved hands cheaper, you will first need a sketch of your rubber stamp. You can draw the design by hand, but it is better to use a stamp drawing program.
Rubber stamp design in Microsoft Word
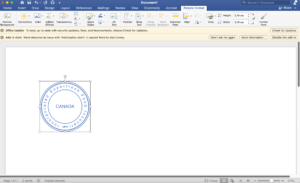 Even in such a familiar program as Word, you can find the answer to the question Is it possible to create a stamp in Word? This requires knowledge and patience. In the main menu, go to "insert", and from there - to "shapes". You need "basic shapes", because it is assumed that the stamp will be round. Here it is called "ring". Set the desired size. Enter the inscription itself. This is done only after a number of steps. Go through the "Insert" tool (then "WordArt" - then the letters themselves will lie as they should). Set the font size and style. Only after this, enter the carved text and all other elements of the image in the input window. You can even change the slope of the letters and symbols of the rubber stamp. Only after this can you save the file with the stamp project.
How to Create a Rubber Stamp in Photoshop
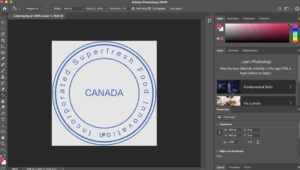 Here is a solution for the pros in creating carve stamps. Here you go by the scheme "create" - "file" - "new" (set the same side in the opened size window) - "horizontal text" - type the letters themselves (select the font style and the size of the text letters). The inscription itself will not be rounded. Find the "text warp" option, and in it - "arc warp". But that's not all. You need to make a duplicate of the layer. Reflect it 180 degrees. Select the "Oval Marquee" tool - only now add the image, which should be in the very center of the rubber stamp. So these are 2 different layers. If you need to go back to edit the text - on the "Layers" widget (on the right) go to the carve 1st layer.
Create a stamp with Corel Draw
This graphics package has a whole utility dedicated to stamps - so many possibilities that it's time to read a chapter in a tutorial on this program. If you are interested in how to create a stamp at home using Corel Draw, then it is definitely not easy.
As you have seen, all the described procedures are complicated if you are a simple layman and not an expert in the field of stamp design. But do not despair. A way to design and transfer a cliche has been invented for a person without professional training and of any age.
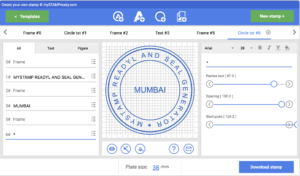
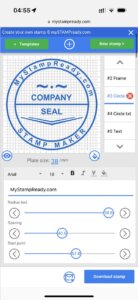
Make your own stamp with the MyStampReady stamp designer
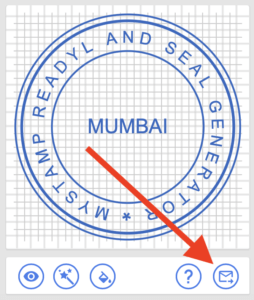
The easiest solution for creating stamps for your project is the MyStampReady (MSR) designer. It is specially designed to create sketches and wedding stamps in minutes. When you open the intuitive MSR interface, select "Create new". You should immediately select the sketch style. Decide what you want. Custom stamps, notary stamps, wedding stamps, personalized stamps, business stamps, company stamps, medical stamps, or fake stamps. The named online stamp maker itself "guides" you - no need to think about choosing tabs and then tools in them. Templates are offered with this or that arrangement of text in a ring or in the middle. You can add any information, including office address and email address. The same with images of rubber stamps. You will have to personally determine the thickness and number of rings. Text? Here you work as in Word.
Create seals and stamps online
 Online creation of a seal layout is convenient for several supply reasons. First, you get a fairly wide functionality that you can use to create your own seal. Second, you don’t need to download or install anything, etc. Just add our online designer to your bookmarks and enjoy the work. Where to start developing a seal:
- The first thing you need to do is decide which shapes will be included in your ink layout.
- Each standard element has its own settings necessary for the correct sizing and positioning of elements within the layout.
 Add these shapes using the standard menu buttons, you can add: a circle, rectangle, triangle, text, text in a circle, QR code or picture. Note that the designer has a large gallery of pictures that you can use in your layout.
- In the layout elements section, you can drag, transfer, delete or select layout ink elements.
Conclusion
If you need to develop a high-quality seal or stamp, it is better to focus on online services. They offer more flexible tools, and provide feedback to the developer and technical support. PC programs are already outdated today, many of them were abandoned at some stage and are no longer being developed.
If you purchased a license for some third-party purposes and use professional graphic editors such as Corel Draw or Photoshop, then with their tools you can draw a print of any complexity, no worse than specialized applications. It is impractical to purchase expensive complex applications only for drawing a seal layout. In some cases, non-specialized programs like Word, Paint, Photo Editor, etc. will help you quickly and free of charge solve the problem of creating a sketch of a simple stamp yourself.
Date of publication 2025-03-28 21:57:29